Editing a Bend
Basic settings for a bend can be viewed and edited by using the Bend panel. To bring up the bent panel for a particular bend click on the bend in the bend status navigator to be edited. Click again on the same bend to open the bend panel to edit that bend. Alternatively, click on the bend in the part that is being edited.
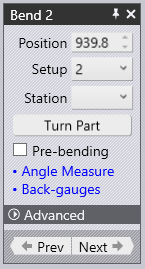
Position – This gives the position of the bend in the machine, also it can be used to move the bend along the machine. The value displayed here is the position of the left end of the bend on the machine’s scale.
Setup – This is a complete assemblage of punches and dies on the machine; some parts require multiple setups to be processed fully, and for such parts, Bend will generate multiple NC codes (one for each setup). In this section, a bend can be moved to a different setup. This option will only appear if the part has multiple setups.
Station – This is an aligned set of punches and dies in a setup, used to process a bend. Depending on the complexity of the part, some setups may contain several stations positioned along the table of the machine. Different bends may be processed at different stations. In this section, a bend can be moved to a different station. This option will only appear if the part has multiple stations.
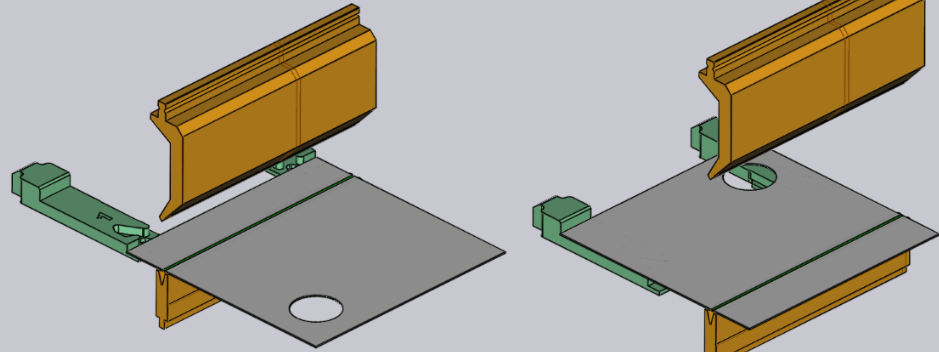
Turn Part – This switch is used to flip the part. The image below shows the effect of clicking this button (clicking it again will restore the original orientation).
Pre-bending – Enable this option to split a bend into two separate operations – a pre-bend, and the finishing bend. The software can determine automatically when a pre-bend can be used to avoid collisions and will turn on the pre-bending option for such a bend. This switch provides a manual override for this (to turn on/off a pre-bend).
Coining – Enable this to use coining operation. This is only enabled if coining would be possible (typically, this means there is a coining-capable punch and die that can be used). Coining requires more press force but can result in a tighter bending radius than air-bending can. Coining also requires a punch and die with the exact angle that is needed for this bend operation.
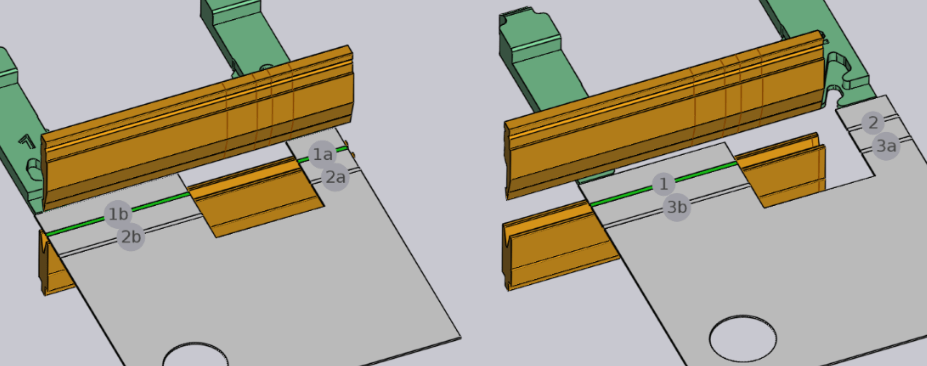
Ungroup – This appears when editing a multiple-span bend. A multiple-span bend is made of two or more collinear bending spans. If the grouped bend can be ungrouped and processed as separate bends, this button can be used to break this bend operation into two separate ones. The image below shows how bend 1 (displayed as 1a and 1b in the sequencing mode) splits into bends 1 and 2 after regrouping.
Angle Measure – This is used to display the ACB panel for this bend. This button is only visible if one or more angle measurement methods are available for the selected machine.
Back gauges – This is used to display the Gauge edit panel for this bend, allowing modification to be made on the back gauges.
Skip Bend – This switch is used to not process a particular bend. This is useful to mark some bends as being processed with a different technology than the press brake (for example, a punch-press or a panel-bender). It is beneficial to move a skipped bend to the beginning or the end of the process sequence, depending on whether it should be treated as already done or to be done later, as this will then do a more accurate collision check.
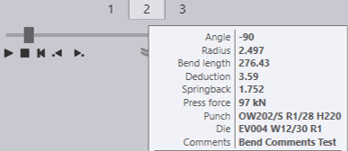
Comments – This is a field to enter comments for each bend. Then, in the tooltips displayed for that bend, the comments are also shown. The comments entered are limited to 64 characters, and these comments are output into the BNC file for the operator.
Prev – This will display the Edit Bend panel for the previous bend.
Next – This will display the Edit Bend panel for the next bend.
